Survivors!
Today we wanted to talk about mastering arithmetic. Well actually we have to say calculate probability. This game is based on making countless skill test. Not only does it make this game a challenge, it also gives a new twist to the plan that you are working out.
the choas bag

The chaos bag is the most important thing when it comes to calculating probability. Every time you and your fellow players start a new campaign or quickly play a side quest alone on a Sunday, you have to prepare a chaos bag.
This bag / bin can be anything. We started with a bin and nowadays we now save real cool bags in all shapes and sizes. This way you can also bring extra theme to the table to make it an even more exciting adventure.
If you're using a bin, make sure you're not trying to cheat. This never benefits and frankly this game is sometimes so difficult that even cheating doesn't make it.
In the chaos bag are tokens that you have to take every time you want to do a skill test. Let's look at an example below. So that you new players or people who still need to be persuaded can see what exactly you mean by a skill test.
skill test


Let's take a look at what a skill test does. There is a Swarm of rats in Roland's Threat area. These rats do a damage of 1 and Roland wants to prevent this by eliminating these rats earlier. Roland is going to do a Fight action against these rats. Roland's Fight value is 4 and the rats are only 1.
Roland therefore has a 3-point lead. Whatever happens as long as Roland doesn't fall below those 3 points, he does 1 damage to the rat. Now let's dive into that Chaos bag before we continue with the results of the skill test.
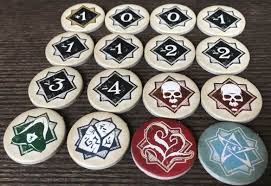
Every skill test you do or have to do, you have to grab a chaos token in the chaos bag (left). Each scenario or campaign mode starts with a different ratio of the tokens. The number tokens speak for themselves. + 1/0 / -1 / -2 / -3 / -4 There is nothing difficult about that. So in short Roland would take a +1 token then his Fight value becomes 5. If he takes a -4 token then his fight value becomes 0.
Then we now look at the Swarm of rats. These have a fight value of 1 and Roland must match it or rise above it to cause damage to the rats. He can take any kind of tokens as long as he doesn't fall below 1. In Roland's case, he would only lose if he took the -4 token. This is not entirely true as we have now only used the tokens with numbers. Let's also take a closer look at the tokens with an image.
the tokens
As you can already see in the image above, there are also a number of tokens with an image.
Here is the name of the specific tokens.
Skull token / Skull
Squid thing / Elder sign
Blue Book / Tablet
Man with a hood / Cultist
RED Tentacles / Auto fail
Blue star / Elder sign
Let's take a look at what these tokens do in certain scenarios.
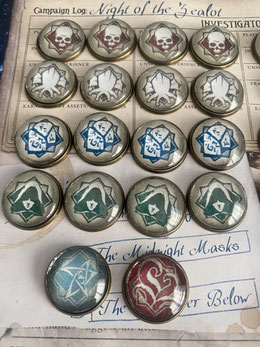
special tokens


Now if we take a look at the scenarios in the core set. Above we have taken the scenario cards for a moment and so we can compare them. Each token therefore has a different modifier for each scenario. At the gathering, the Cultist is -1 and if you fail you take 1 horror damage. At The Devourer Below, the Cultist is -2 and your closest enemy gets a doom token. So you can see that each scenario has its own rules regarding special tokens.
In our next blog we will take a closer look at the game mechanism when you look at player windows. Every skill test or rather every event in your play session comes in a sequence of certain windows. Be a master of these windows and you will outperform your friends considerably.
Survivors! I hope you have learned a lot again with this blog! Keep Arkham and the world a safe place for the normal people!
Remember that English is not our native language so there may be some spelling mistakes.
Jeroen - dutch blogger company

