miskatonic museum
It all began when a man named Wilbur Whateley entered the Orne Library looking for Olaus Wormius’s Latin translation of a book called the Necronomicon. Wilbur already possessed a beaten-up English translation by Dr. John Dee, but it was insufficient for his purposes. Armitage turned the man away, fearing what use the strange man had for the book.
Whateley returned in secret, hoping to steal the book ,
but was attacked by a hound guarding the university. Armitage, Rice, and Morgan later discovered Whateley’s body. A description of the foul corpse—semi-anthropomorphic and covered in fur, with a leathery hide and greenish-grey tentacles—causes you to question whether or not Whateley was truly human.
Welcome back to another journey in this amazing journey trough Dunwich! This time we entering the museum to look for a mysterious book called "The Necronomicon". This brand new article will help you survive this horror story in the museum after hours.
The setup
Gather all cards from the following encounter sets:
- The Miskatonic Museum
- Bad Luck
- Sorcery
- The Beyond
- Chilling Cold
- Locked Doors
Put one of the two Administration Office locations and one of the two Security Office locations into play at random. Remove the other versions of Administration Office and Security Office from the game. Then, put the Museum Entrance and Museum Halls locations into play. Each investigator begins play at the Museum Entrance.
Set the 6 “Exhibit Hall” locations aside as a separate “Exhibit Deck.” To do this, perform the following:
- Shuffle the Exhibit Hall (Restricted Hall) and 2 other random Exhibit Hall locations together to form the bottom 3 cards of the Exhibit Deck, unrevealed side faceup.
- Then, place the other 3 Exhibit Hall locations on top, in a random order. All 6 cards of the Exhibit Hall deck should be showing only the unrevealed side, so that the players do not know which Exhibit Hall is the Exhibit Hall (Restricted Hall).
Set the following cards aside, out of play:
- Harold Walsted
- Adam Lynch
- The Necronomicon (Olaus Wormius Translation)
- Shadow‐spawned.
Shuffle the remainder of the encounter cards to build the encounter deck.
Exile rules
Some player cards in The Dunwich Legacy cycle must be exiled when they are used. When a card is exiled, it is removed from the game and returned to your collection. During campaign play, a card that has been exiled must be purchased again with experience points (between scenarios) if you wish to re‐include it in your deck. If exiling 1 or more cards would reduce your deck below your investigator’s deck size, when purchasing cards between scenarios, you must purchase cards so that a legal deck size is maintained (when purchasing cards in this manner, you may purchase level 0 cards for 0 experience cost until a legal deck size is reached).
The Void
Some cards in this scenario reference an area called “the void.” The void is an out‐of‐play area next to the act and agenda deck which the Hunting Horror enemy can enter and leave via card effects. While the Hunting Horror is in the void, it is considered out of play and cannot be affected by player cards or investigator actions.
PRO TIP: The most of us can forget some of the rules of the game. That's because there are many many and many rules. Not only the encounter cards have their own rules but also the player cards. So it's easy to oversee or forgetting some of the rules. But this one is really important for this scenario. Listen up:
- If the agenda Threshold is reached you only advance when it's the time. So in the third window of the mythos phase this will happen.
- Then this is also really importent that ALL THE DOOM leaves play. Included the doom on the Hunting horror and on player cards.
the two administration office's

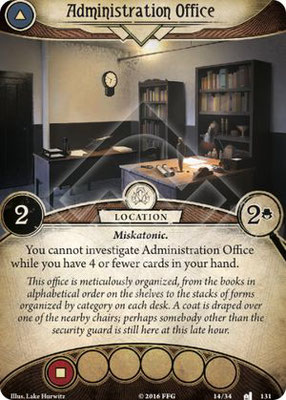
These are the two office's. One of those will land on the table and the other one will leave play.
Office 1 / 1 shroud and 1 clue per investigator. You must have 5 resource to investigate ad this location. The 1 shroud is not bad at all! But the 5 resources are gone before you can say Arkham horror. So it's better you keep in mind that if you want some (almost free) clues that you must go first to this location before dropping your cards on the table.
Office 2 / The second one is the same principle, but it has 2 shroud and 2 clues per investigator.
the two security office's
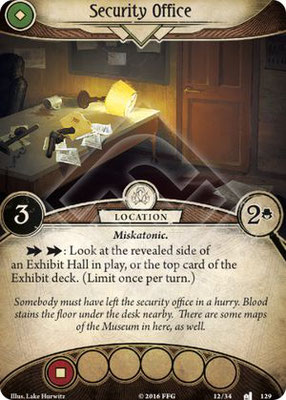
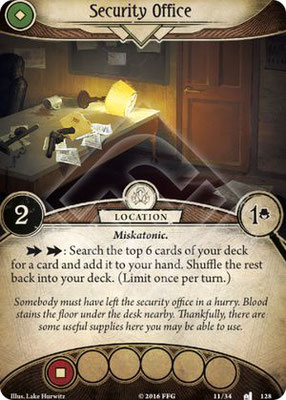
Now let's have a look at the security office's.
Office 1 / 3 shroud and 2 clues per investigator. If you are out of clues and want to grab an exhibit card fast. Then this is your change! But wait! before you will spend 2 actions to draw an exhibit card. Let's not forgot that this action will cost you 2 actions and from our perspective you better get out there and getter clues! But this is still Arkham Horror and if you don't have the time or you running out of clues this is your change.
Office 2 / The better one of the two. 2 shroud and 1 clue per investigator. The same rules as apple for this card.
the journal setup
Here is where the magic happens for this card game. The journal setup. But for this scenario you must choose between the scenario's. Called The Dr. Armitage's fate. You can get 2 options and that has all the do with your ending in the House always wins scenario.
Check Campaign Log. If the investigators were unconscious for several hours: Read Armitage’s Fate 1.
Otherwise, skip to Armitage’s Fate 2.
Armitage’s Fate 1: You are more than a little rattled by your experiences in the university and the Clover Club. You’re not sure what to make of whoever—or whatever—was after Rice and Morgan. Worried about Dr. Armitage, you swiftly make your way back to his home. When you arrive, you find that the latches of his front door have been busted open, and his living area and study have been ransacked. Dr. Armitage is nowhere to be found. Searching his home, you find a journal the intruders didn’t steal tucked beneath several other documents in the bottom drawer of Armitage’s desk. The journal appears to be written in a strange language you cannot decode, using a script you’ve never seen in your entire life. Fortunately, it seems Dr. Armitage had already gone through the trouble of translating it into English. Apparently, it belongs to one “Wilbur Whateley.”
The journal—along with Armitage’s many notes—tells a startling tale, one you would scarcely believe had it not been for your harrowing experiences earlier tonight...
- In your Campaign Log, record that Dr. Henry Armitage was kidnapped.
- Each investigator earns 2 bonus experience as reading Wilbur’s journal gives them insight into the hidden world of the mythos.
- The story continues in Scenario II: The Miskatonic Museum.
Armitage’s Fate 2: When you arrive at Dr. Armitage’s home in Southside, you find him sitting at his desk, pale-faced and sweating with worry. He is grateful to you for searching for his colleagues, but he doesn’t look relieved. With a long pause, he straightens his glasses and explains:
“I’m afraid I must apologize. There’s something I didn’t mention to you earlier.” Dr. Armitage then spins a tale you would scarcely believe had it not been for your harrowing experiences earlier that night...
- In your Campaign Log, record that the investigators rescued Dr. Henry Armitage. Any one investigator may choose to add Dr. Henry Armitage to his or her deck. This card does not count toward that investigator’s deck size. It can be found in the Armitage’s Fate encounter set.
- The story continues in Scenario II: The Miskatonic Museum.
Then there is another thing: (we sum up some stuff that can happens)
- If you have cheated then you must put 1 Elder thing (gas mask) into the chaos bag.
- You can rescue Dr. Morgan but he also can being kidnapped.
- You can have the gang behind you along the way further in the campaign, or they wanna hurt you.
- Last but not least, you can suffer a trauma.
We will not tell you all on how to get these stuff because of the many different endings (resolutions) and you will have to do your own digging around in Arkham. Thats the best experience. We will help you get along but we don't drop everything on a silver plate for you.
the first (visible) locations
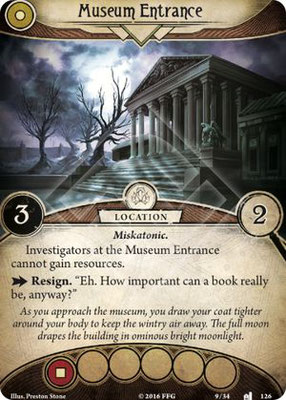
These are the two locations you will see first. Every player begins in the Museum entrance.
Museum entrance / 3 shroud and 2 clues. If you are In this location we cannot gain resources so your first turn will be limited with your 5 resources you start with. It's also one of the location to drop out of. For an action you can forget about the book and get the hell out of there. But you probably would know thats not an option!
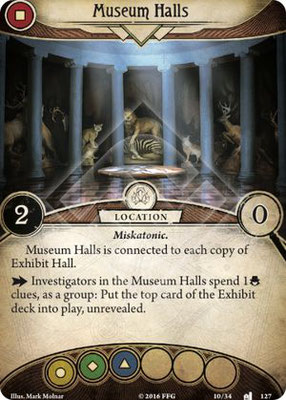
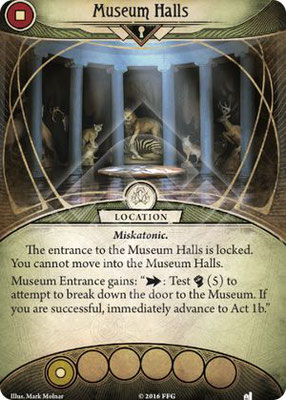
Museum halls / If you managed to get bypass the entrance this is the location you will land in. It's has 2 shroud and zero clues. Thats a bummer, but with the clues you and your fellow players collect from the Entrance location (if you had done that part we assume) than this location comes in handy. For 1 action and 1 clue you can draw a card from the exhibit deck. These exhibit locations will give you extra locations to explore and must of them will have victory points! Hell yeah!

Museum Halls - LOCKED
What you already know is that the door to the museum is locked. You will have 2 ways to get in.
1 is to gather the clues and go peacefully to the halls.
2 Break down the door with a 5 fight skill test and go straight on into the halls. But there is a bonus for the peaceful way.
the exhibit deck


This is called the exhibit deck. You will need to be in the museum halls to get these cards. You must spend an action and a clue to draw one of these cards. No let's have a look what's on those cards.
Hall of the dead / 3 shroud and 2 clues per player. Forced effect, is you fail investigating at this location take 1 horror.
Egyptian hall / 3 shroud again and again 2 clues per player. The same as the one before only you will lose an action. This is probably worse than losing a horror. Actions are worth a lot more than your own sanity.
Nature exhibit / 4 shroud and 1 clue per player. The toughest of them all. 3 shroud is probably easy to overcome but 4 is above average and not a lot of clues you will/can find here. The worst is that is you move to this location you will lose 2 cards. But because of this awesome article you now know you must skip this one.
Athabaskan exhibit / 1 shroud and zero clues. AUGH! You lost all your actions and you need to end your turn. Thats a really bad situation. There's only one positive thing, you will get +2 agility to shake of the hunting Horror.
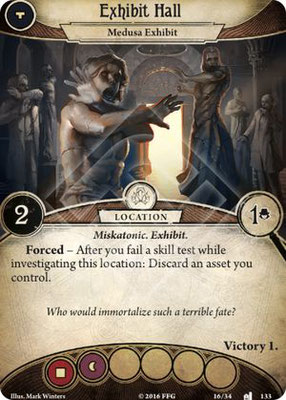
Medusa exhibit / 2 shroud and 1 clue per player. An easy one. But beware if you manage to lose investigating this location you must discard an asset you controle! One of the easiest ones but with a horrible outcome is you didn't manage to succeed in the skill test.

Exhibit Hall - restricted Hall
Your main focus is on this location. But first you will have to find it.
To find this location go to the museum hall entrance and spend a clue and action for a new exhibit location and maybe it't there. Otherwise you will have to do this action over and over again to find it. Because the smelly spell book is somewhere around this location.
Restricted hall / 3 shroud and 2 clues per player. It's a simple one. If the Hunting Horror is ad this location, the location cannot be investigated. 1 victory point.
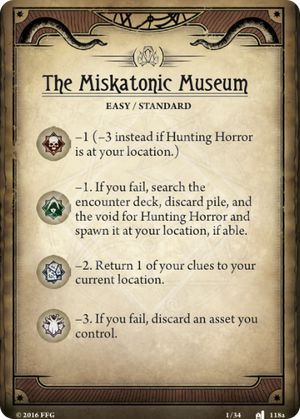
the hunting horror
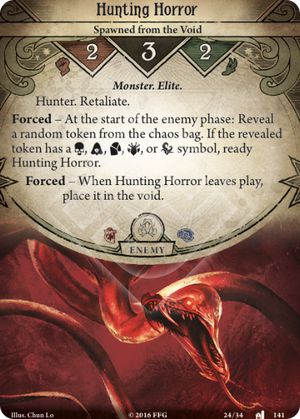
This whole scenario is based on one bad creature called "The Hunting Horror" Let's see what this Horror will mess up for you. The museum is full of strange things but no player encounter this creature before!
Hunting Horror - Spawned from the void
Hunter = every enemy phase it will move one location closer to the nearest investigator.
Retaliate =if you miss an attack it will automatically attack back.
Forced action = this is a nasty little trick of this monster. If you think you got away by evading this monster. Then there is a small chance you will ready's faster than you think. At the start of the enemy phase draw a token from the bag and if it is one of the indicated tokens he will be ready again.
PRO TIP: This monster can't be killed. If you killed it, it will respawned to the void and can come back. His stats aren't as bad as you think. 2/3/2 it's an easy fight for just 2 fight skill icons and so is evading him. But he is ready in no time because of the forced effect. Then there is his health of 3. If you use a weapon then you will need probably 2 actions to send it back to the hole where it came from. His attacks will deal 1/1 damage and horror. So its not that he will bite your head of but he's gonna be around for a long time. So consider to remove him fast!

Then we have to talk about this next card. This card will trow in an extra difficulty if we are talking about the Hunting Horror. This card is called Shadow - spawned. What it basically does is buff up the hunting horror in its worst way. It will get all +1 for each skill test and when the 3 resources mark on the spawned horror is reached. Every time the Hunting Horror enters play you must either place a shadow spawned attached to the hunting or place a resource token on it if that card is already in play. It will also gain the MASSIVE keyword. So you may think what is massive all about here you go!
MASSVIE RULE:
Massive is a keyword ability. A ready enemy with the massive keyword is considered to be engaged with each investigator at the same location as it.
- An exhausted enemy with the massive keyword is not considered to be engaged with any investigators.
- An enemy with the massive keyword cannot be placed in an investigator’s threat area.
- When an enemy with the massive keyword attacks during the enemy phase, resolve its (full) attack against each investigator it is engaged with, one investigator at a time. The lead investigator chooses the order in which these attacks resolve. The massive enemy does not exhaust until its final attack of the phase resolves.
- When an enemy with the massive keyword makes an attack of opportunity, that attack only resolves against the investigator who provoked the attack.
- A massive enemy does not move with an engaged investigator who moves away from the massive enemy’s location.
- If an investigator fails a combat test against a massive enemy, no damage is dealt to the engaged investigators.
act and agenda nr. 1
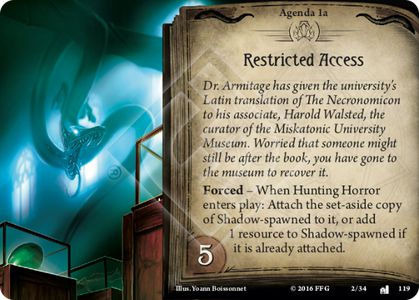
Agenda NR. 1 - Restricted Access
Dr. Armitage has given the university’s Latin translation of The Necronomicon to his associate, Harold Walsted, the curator of the Miskatonic University Museum. Worried that someone might still be after the book, you have gone to the museum to recover it.
This whole scenario spins around a book called "the necronomicon" and was given to Harold Walsted. Now Walsted is the curator of the museum and you and your fellow players are afraid that the book will be stolen. Now you set off to the museum to collect the back for Dr. Armitage.
Forced effect: when the hunting horror enters play place attach the spawned shadow to it. When this card is already in play put a resource token on it. This token will not be removed if it goes back to the void. It has a doom threshold of 5.
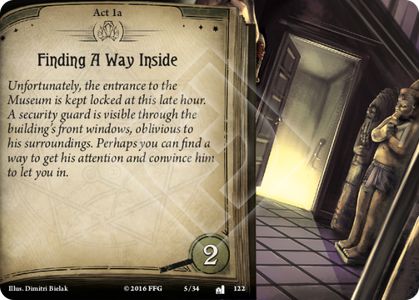
Act NR. 1 - Finding a way inside
Unfortunately, the entrance to the Museum is kept locked at this late hour. A security guard is visible through the building’s front windows, oblivious to his surroundings. Perhaps you can find a way to get his attention and convince him to let you in.
You are late and the museum is already closed. You can't get in. Collect 2 clues to advance. But there is another way to get in the building.

Each investigator begins in at the Museum entrance obviously because it's closed at night. At the entrance you can't get any resources so you will have to stick with your starting resources of 5. If you don't want to mess around at the closed museum here is also the change to back down and resign. But he you want a challenge go ahead! The entrance has a shroud of 3 and 2 clues. Just the amount you needed to get in the museum.
But wait there is another road you can take. You can smash the door down! Test 5 fight to brake down the door. If you succeed advance to act NR 1B. You all thinking is that wise to break in????
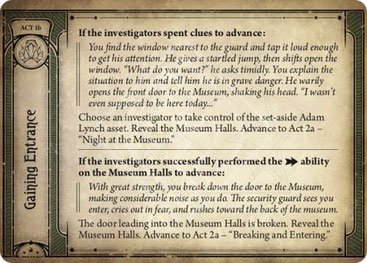
Ok, it's clear now. This is what will happen if you make a choice.
Gathered the clues? Then will get Adam Lynch this ally will help you along the way. But we will get back to our dear Adam. Advance to act NR. 2 - Night at the museum.
Was one of you the bad guy and destroyed the door? Then its a sad thing because you didn't get Adam Lynch. And you will advance to act NR. 2 - Breaking and entering.
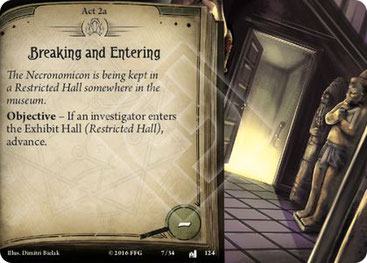
Ok, you was the man or girl that breaks down the door but that comes with a price. You didn't got Adam and you now have to face a new treat. Breaking and entering card. It has no clue threshold and you advance only when you reached an Exhibit restricted hall.

If the 5 doom threshold was reached the next thing will happen to you and your fellow players.
Act Nr. 1B - A creature of the void
If the Hunting horror was already in play place 1 doom on it. If it was not in play find it and place it at the museum hall. So you probably be better off to avoid that place. Go in and out. Shuffle the discard pile back in the encounter deck.
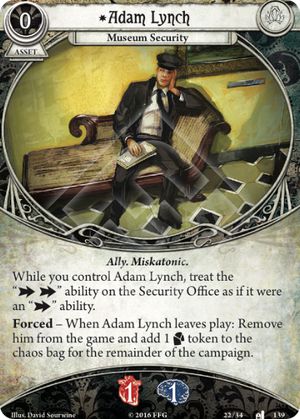
Adam Lynch
You only get this security guard when you enter the museum by clues. NOT BREAKING THE DOOR DOWN!
It's a bad ally let that be the first thing we say about him. He only has 1/1 health and sanity. And if he dies you must put a tablet token in the chaos bag. But there is a handy little trick, if you controle him he has the ability to use less action points on a security office location and thats gonna be handy!
act and agenda nr. 2


Agenda NR. 2A - Shadows deepen
The shadows in the museum grow and become darker. As the shadows lengthen and shift, they begin to suggest the sinewy body of an uncanny creature darting at the periphery of your awareness...
The same forced affect is still active as like agenda NR. 1A. But it has a higher doom threshold of 7. Keep in mind that the hunting horror also gathers doom tokens by encounter cards. So this will be over quicker then you think. So beware!
Act NR. 2A - Night at the museum
The Necronomicon is being kept in a Restricted Hall somewhere in the museum. Adam barely knows his way around, and gives a startled jump at every creak of the old building. "I just started here last week," he explains. "What sort of trouble did you say was going on?" You haven’t the heart to give him the full story.
If you play it safe and you managed to advance with the amount of clues you needed then this act card will be your next objective. But the same goes for this card. If you managed to get to an Exhibit restricted hall advance.

Agenda NR. 2B - Hunted down
When the agenda flips it's always meaning a lot of terror. If the Hunting horror is in play place 1 doom on it.
If the hunting horror is not in play search for it and place it at the museum hall. Shuffle the discard pile bak in the encounter deck. Don't forget the PRO TIP we used in the beginning of this article.

Act NR. 2B - The guard's fate
There are no clues needed to get to this point. You will only need to get to the restricted hall. Choose a player how will get controle over the Curator (Harold). Then spawn the hunting horror ready at the Restricted hall where you at. Now if you just evaded the Hunting horror too bad it's back at you again.
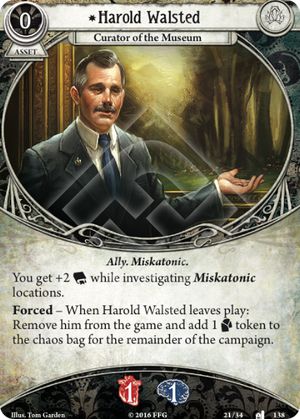
Harold Walsted - Curator of the Museum
With Harold at your side you will get a +2 intellect bonus. So choose wisely how will get controle over Harold. It only counts on Miskatonic locations so keep that in mind.
His stats are low, so don't think about is to use him for soaking damage/horror. If you lose him on your journey in side this creepy museum than you wil suffer an extra Tablet token in the chaos bag for the remainder of this campaign. The tablet stance for -2 for the skill test and if you lose you will have to put up a clue on your location from your own hard earned clues.
act and agenda nr. 3
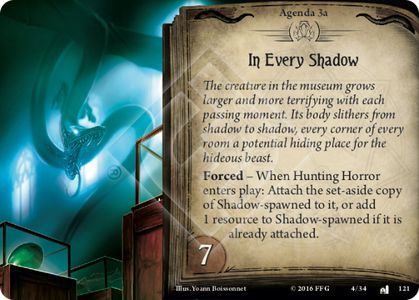

Agenda NR. 3A - In every shadow
The creature in the museum grows larger and more terrifying with each passing moment. Its body slithers from shadow to shadow, every corner of every room a potential hiding place for the hideous beast.
That's funny, the same forced effect us agenda number 1 and 2. Also with a 7 doom threshold.
Act NR. 3A - Searching for the Tome
Somewhere in this area is Olaus Wormius’s Latin translation of the Necronomicon. You must find it and escape while you can!
You reached the location where the tome is. Clear out all the clues from the location and advance. That's an easy task, if it wasn't for the Hunting horror to lurk around. If you manage.......

Agenda NR. 3B - Driven out
If you didn't manage to gather the clues from the restricted hall and the threshold is reached then the following things will happen.
- In your Campaign Log, record that the investigators failed to recover the Necronomicon.
- Each investigator earns experience equal to the Victory X value of each card in the victory display.
- Suffer one damage trauma.
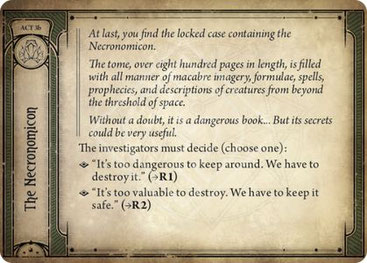
Act NR. 3B - The Necronomicon
if you and your fellow players advance by gathering all the clues from the restricted hall then you will advance and the next things will happen to you.
PRO TIP: because you can't gather clues from this location if the hunting horror is here. Someone has to draw out the hunting horror while the others clean it from clues. Choose the following Resolution and read on.
Destroy the smelly spell book or keep it?
Resolution 1 (destroy) :
- In your Campaign Log, record that the investigators destroyed the Necronomicon.
Resolution 2 (keep) :
- In your Campaign Log, record that the investigators took custody of the Necronomicon.
- The investigators have earned The Necronomicon (Olaus Wormius Translation) card. Any one investigator may choose to add The Necronomicon (Olaus Wormius Translation) to his or her deck. This card does not count towards that investigator’s deck size.
- You have given in to the temptation of power. Add 1 Elder thing chaos token to the chaos bag for the remainder of the campaign.

The Necronomicon - Olaus Wormius translation
To earn this creepy old smelling spell book gather all the clues from the restricted hall location.
- The researchers have earned the map of Necronomicon (Olaus Wormius translation).
- Every researcher can choose to add the Necronomicon (Olaus Wormius translation) to his or her deck.
- This card does not count for the deck size.
- You have given the temptation of power. To add 1 Elder thing token to the chaos bag for the rest of the campaign.
Our work has finished and it was a hell of a creepy museum. We hope you all enjoyed reading this new article! Hopefully you will manage and use the PRO tips we gave you.
Jeroen - dutch blogger company

Survivors!
Feel free to email us for further questions, topics or cool ideas for the website.
Would you like to know more information about our new Project Dungeon to Dungeon (only in the Netherlands)? You can request the information by e-mail.
You can contact us on the following platforms, which can of course also be followed where we post great post.
Twitter: @ah_dutch
Instagram: ahdutchblogger
Mail: dutchbloggercompany@gmail.com
Do you also think this game is as cool as we think it is? Then support us on Patreon to make it more accessible for us! www.patreon.com/dutchbloggercompany
