the midnight masks.....
Survivors! Hopefully you survived the first scenario. Well, just like LOTR LCG it was actually the intention to write a nice intro, but these remain fairly neutral with Arkham horror. Since we don't know which resolution you ended with. The story unfolds and it's entirely dependent on which Resolution end you have reached. (in this case you always end up at intro 3).
You managed to figure out what's going on. There is a secret cult that worships the Ancient Ghoul. They kill or kidnap ordinary citizens to give to the Ghouls so they can feed and not have to come out. Well, one of those food storage spots was destroyed and Ghouls came into town. They brutally murder civilians. Lita and the investigators have tracked them down, this masked Cult and it's up to us to track it down before it's too late .....
just one more time about the phase and actions.....
What was the order of the Phase again?
1- Mythos phase (on the first turn of the game you must skip this)
• put one doom token on the agenda.
• if there are enough doom tokens on the agenda, it must be turned over.
• take one card per player from the encounter deck. One after the other so that you can support each other.
2- Investigator's phase
• each investigator takes 3 actions. Take 3 actions before the other investigator's turn. (action list is below)
3- Enemy phase
• each enemy with the term Hunter crawls one location closer to the nearest investigator.
• each engaged enemy attacks (if possible).
4- Upkeep phase
• reset all cards (flip the mini cards).
• all exhausted cards are standing up again.
• take one resource.
• take one card.
• each investigator counts his or her cards in his or her hand (maximum 8)
Action phase:
You can only take 3 actions per turn. Here's the action list you can choose from:
- take one card or one resource.
- trigger an ability (the arrow).
- play a card (asset, item, event ect).
- move (move to adjacent location)
- fight or engage an enemy at your location.
- Evade an enemy (try to outsmart an enemy)
- investigate (try to find clues at your location by means of a skill test)
Triggers such as the Zig zag sign (lightning bolt) or the response sign (spinning arrow) do not count as an action.
If you are in engaged with an ememy, your first action should be Fight or Evade. You can also choose Parley or Resign in some cases, but this depends on what the enemy card says. If you don't do this, the enemy will take an attack or oppertunity and you will immediately receive damage or horror.
the setup
Like every game session, find all encounters cards in your collection. Shuffle these cards well to make the encounter deck. Then collect the Cult of Umôrdhoth set and turn these cards into the cultist deck. So you have two types of encounter decks in this scenario. So one encounter deck and the Cultist deck.
Some scenarios have multiple variants of one location to give each playing session a different turn. Choose one Downtown and southside location the other Downtown and Southside are not used. Now collect the other locations (Northside, Easttown, Rivertown, St. Mary's hospital, Graveyard, Miskatonic university and your house).
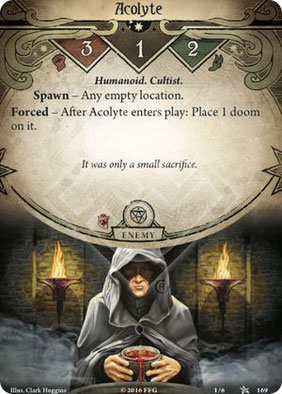
After preparing all locations and encounter decks, there is only how many Acolytes comes into play. If you only play this scenario alone or single, nothing will happen, with every player who participates you must bring one Acolyte into play. In the scenario rule sheet you can find the locations where they will be located. Now you are ready to get this job done.
agenda and act nr. 1a


Lita thinks there is a secret cult that feeds the Ghouls and keeps them alive beneath the city. You soon find out that this cult has spread across Arkham. You start at your home (if it hasn't burned down) and you explore Arkham. You soon get the feeling that you are being chased yourself. You only have one night to find as many cultist figures as possible before midnight.
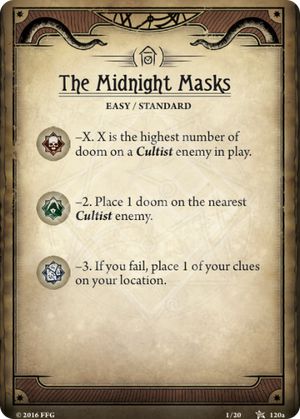
The message is clear you need to find as many unique cultists as possible, there are 6 in total but not all of these cultist enemies are in the cultist deck. You have a lot of locations this time and you really have to go through every location. You need all the clues you can get. You can use an action from the act card and that gives you the chance to take a cultist card for 2 clues. We never got further than collecting 4 Cult people, but we have to say that we haven't been back to The night of the Zealot with our more extensive card pole yet.
After the 6th doom token on the agenda deck it flips to trouble so be on time....... You can always do a resign. We also call this dismissal, because we believe that you are the scenarios assignments that the investigators take on. This is NOT a defeat, don't confuse this. Resign is fairly common in our play sessions. You will get a little harder here and there and you may have to do your best in the next scenario. But in the end it is always better than looking completely lost or even death in the eye....
You have one night to find the members of this cult and reveal their plan. The more members of the cult you can find and interrogate before midnight, the better......
the different locations you need to visit


We will take a look at all locations. In the beginning you have to make a random choice for a number of locations. This mechanism will return more often. This way you never know what to expect and you have a completely different experience every play session. It's quite a list, but make yourself a cup of coffee or tea and read it at your leisure. Not only do you know what will happen next, you can also prepare well.
PRO TIP: Leave all enemies alone in the beginning! This way you have the chance to collect as many clues as possible first. Then you have enough time at a later stage to take out the enemies that create doom faster. One has to focus on collecting clues while the other gets ready for battle and possibly also collects some clues along the way.
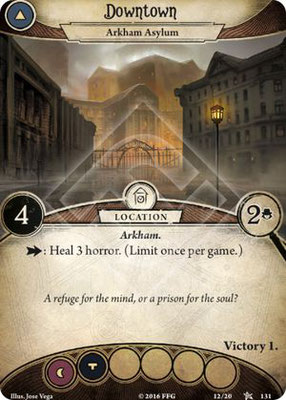
Downtown 1 / 4 shroud, 2 clues per investigator and you can heal 3 horror once per game. This will cost you an action. This location does have a victory bonus. The other Downtown doesn't have this.
Downtown 2 / 3 shroud, 1 clue per investigator and you can get 3 resources once per game. This also costs you one action.
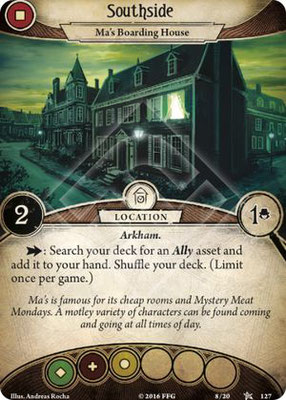
Southside 1 / 2 shroud, 1 clue per investigator and you can find an Ally card from your deck in this hand with an action. This action also only applies once per game.
Southside 2 / 3 shroud, 1 clue per investigator and you can take 3 cards with an action. Once per playing session.
Rivertown / This location has a free clue. It only has 1 shroud and every investigator can handle this obstacle with their own hands. 2 clues per investigator.
Your house / This is a location that has not yet been in play for us. When the Ghoul Priest comes into play, he will spawn in your house. 2 shroud and 1 clue per investigator. You can also take an action for an extra card and resource.
Miskatonic university / A location for the real students (seekers) 4 shroud and 4 clues per investigator. so there is plenty to gain here. You just have to get over the 4 shroud. This location also has action so you may draw the first 6 cards and pick a Tome of Spell card to add to your hand. This location has victory points. So try to get these you need them badly.
St. Mary's Hospital / 2 shroud and 1 clue per investigator. You are of course in the hospital so you can heal 3 damage for an action. This also only applies once per playing session. So heal the investigator who needs the most or has to last the longest.
Easttown / 2 shroud and 1 clue per investigator. If you are in this location, your allies with 2 resources will cost less. So save your heavy allies for this location.
Graveyard / 1 shroud and 2 clue per investigator. When you enter this location you have to do a skill test for 3 willpower. If you make it you can stay at this location. If you fail you must take either 2 horror or you will go back to Rivertown. This location has victory points.
Northside / 3 shroud and 2 clue per investigator. For 5 clues you can take 2 tokens from the token bank. The rule also applies to this promotion once per playing session. This location has victory points.
the cult of the umôrdhoth


These are the five cultists that you will interrogate/defeat and add to your victory display to complete this scenario. Frankly, I don't know anyone who has interrogated/reported them all and you probably aren't meant to be. But leave a comment if you managed to do it. Let's see who we're dealing with.
Each enemy still gives a nice contribution to victory points. You really need it in the last scenario.
PRO TIP: Think of the TEMPO mechanism, each enemy you have to catch has 3 to 4 hit points. Which means that you lose 1 entire turn to 1 enemy anyway. Unless you throw weapons and spells into battle. Want to know what we mean by TEMPO? Read the blog.
"wolf-man" Drew: The Cannibal / 4-4-2, an enemy you easily avoid. The only drawback is that you have to beat them and its 4 combat makes that difficult, unless you are working on a Roque deck. Then you can easily deal damage to enemies that you have avoided. It's also tricky that if Drew attacks you or one of your fellow players, he heals himself from 1 damage.
Herman Collins: The undertaker / 3-4-4, Herman is an easy one. In this scenario, take what you can get. Even though we place great value on cards in our hands. Yet we discard 4 without any discussion with each other. Parley namely with Herman for 4 cards and you don't even have to deal a punch or punch. If you still want to beat him, we advise you to do so as soon as possible. 4 hitpoints is quite a bit and without extra weapons or spells this will cost you 1 turn.
Peter Warren: The occult professor / 2-3-3, Peter is also a wimp compared to other enemies you have to defeat. He's not very strong and you bribed him like that. Do a Parley action with Peter for only 2 clues and he will accept it. That was a really easy one.
Victoria Devereaux: The collector / 3-3-2, This is a real woman of class. You can make a deal with this woman, but it will cost something. For 5 resources you can do a Parley action with Victoria and she will join you. We never outsource 5 resources to her. We leave her as the last viable enemy. If we have resources left, we take her with us, otherwise we ram her off the table and she has to come with us. Her stats don't mean much anymore in the last phase. You must of course have good board control.
Ruth Turner: The Mortician / Ruth Ruth Ruth, her stats of 2-4-5 don't really scare anyone. You just got her out of here like that. Only then do you read the map carefully. ouch! you have to dodge her by as much as 5 points. This is not very difficult, but the moment where you are you are not quite involved with the Roque class yet. The first players usually reach for guardian or seeker. This makes it a bit more difficult. So leave her alone and don't try this. Shame about the actions.
agenda nr. 1b
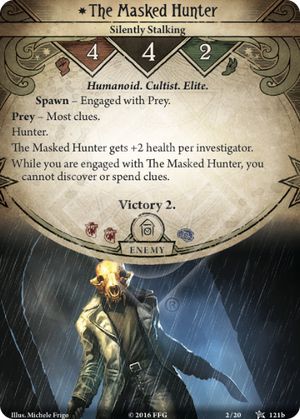
Once you put the 6th doom token on Agenda 1A, it flips and The Masked Hunter comes into play. This hunter goes to the player who has the most clues.
His stats 4/4/2 make this an easy enemy to dodge. Only what we said before is that you are probably not playing with a Roque class. This makes it a bit more complicated. His 4 Fight power is fairly normal and you are now 4 or 6 turns further and you already have a reasonable board control. The only downside is that this enemy gains +2 health for every player in the game. So in most cases that we play this is soon a +4 health.
The moment The Masked Hunter comes into play you are already so far (if all goes well) that you better leave him alone. So just avoid this enemy. It took us 3 turns to defeat this enemy and this was a real shame! Anyway, when we played this scenario, we weren't that busy with TEMPO. We come from the wonderful world of Middle Earth, of course. This is about defeating as many enemies as possible. This works a little differently. Carefully discuss what actions you are going to take before you do this.
agenda nr. 2a en 2b


The minutes are slowly ticking away, you are looking for the cultists and the one who can get hold of you. You also have to question. But the clock keeps ticking...
After The Masked hunter comes into play, the Mythos world's agenda continues. You now have 8 turns to catch as many cult enemies as possible. Remember that the 8 turns can be shortened by the enemy Acolyte. When this enemy comes into play, also there comes an extra doom token into play. Beat it as quickly as possible otherwise your turns to achieve your goal will be very short.
Here too you have the choice to resign before it is too late. If you resign, the consequences are less than if you go over the edge. If you chose to resign then you go to R1, otherwise if you flip the agenda 2A card through the 8 doom tokens you go to R2.
Twelve bells ring through the city. It's midnight. There's no more time to explore the city; you have to act on the information you have gathered from the cults you have found....
act nr. 1b
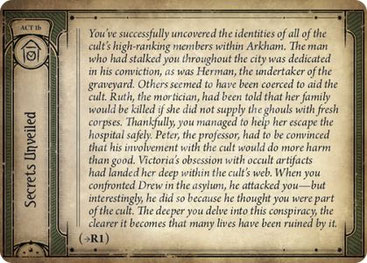
You have successfully discovered the identities of all high-ranking members of the sect within Arkham. The man you'd stalked through town was committed in his belief, as was Herman, the graveyard undertaker. Others seemed to have been forced to help the cult. Ruth, the undertaker, had been told that her family would be killed if she did not provide the ghosts with new corpses. Fortunately, you were able to help her escape safely from the hospital. Peter, the professor, had to be convinced that his involvement with the cult would do more harm than good. Victoria's obsession with occult artifacts had landed her deep in the web of the cult. When you confronted Drew at the asylum, he attacked you - but interestingly, he did so because he thought you were part of the cult. The deeper you dive into this conspiracy, the clearer it becomes that many lives have been destroyed by it.
Survivors! You made it! And frankly, you've come further than we have. If you got to R1. You have questioned or defeated all the cultists and can now move on to the next scenario with much better preparation. Don't forget to count the victory points and spend them in a bombastic way, because you will need them badly in the next scenario.
let's look at the ghoul priest one more time
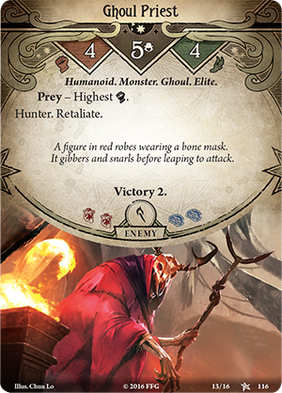
A figure in red robes with a bone mask. It babbles and growls before jumping to attack....
The Ghoul Priest....
Monster, Humanoid, Ghoul and Elite!
All scary names but only these 3 are relevant.
Retaliate, Prey and Hunter.
Retaliate / means that if you fail in a fight or evade action, the Priest deals its horror and damage to you immediately.
Hunter / if the Priest is in a different location he will move one location closer each enemy phase.
Prey / If there are 2 investigators in the same location you can't choose who engages him, but he automatically goes to the one with the highest fight ability in this case.
His stats are horrible 4/5/4 you can't just beat this monster.
4 fight / So you must have a high fight skill to match this.
5 health / per investigator so in our case it was 10 health. Difficult since you only do 1 damage each time if you have no items or weapons.
4 evade / Tricky package don't you think. So everything is high about this Priest, but don't forget that you still have Lita chandler, she gives you +1 damage for each succeeded attack and you get +1 fight skill if you are fighting a monster.
Encounter analyse
The Midnight Mask, Chilling cold, Nightgaunts, Dark cult and Locked doors. These are the encounter sets that we examine for a complete analysis. Just like on our other website www.lotrdutchblogger.com, we also take the time and effort to make it clear with categories. We are going to divide these cards into the following categories,
Enemies / Treachery / Treachery with skill test.
Enemies


You're probably thinking that it's not that bad with the enemies in this scenario. But make no mistake! You also have to deal with the cultists. Let's see what other enemies you can face.
Wizard of the Order / One that we absolutely must not forget. We've already talked about the Acolyte that will follow, but this Wizard will blow your Doom high in the sky if you're not careful. His stats of 4/2/2 tell us you can easily get rid of him. Provided someone from your team has a high Fight skill. You can have the 4 Fight points if all goes well and with its 2 hit points you can easily and quickly get rid of it with 1 action. Use weapons or spells to make it easier on yourself. It still takes 2 turns with just your fist and this Wizard quickly collects an extra Doom token each turn. He also has the keyword Retaliate which means revenge. If you miss giving him damage with a Fight skill test, he will attack automatically. Luckily it's not a Hunter.
Hunting Nightgaunt / The Nightgaunt is an enemy that is not easy to avoid. Every bad token counts double when you try to avoid this enemy. So -2 becomes -4. His high hit points bring more worries. You basically have to save all your actions to collect those cult people and not bother with beating monsters. You are of course unlucky that this enemy is a Hunter.
Acolyte / We've already talked about this cult dude. You know he brings extra doom with him, but what else this enemy? Well actually nothing at all. He only has 1 hit point, so you got it out of the way in no time. 3 Fight is not exciting either, from our experience DO NOT USE WEAPONS! This is a shame and you will need them more for other enemies.
Treachery


We've split the Treacheries into two categories as a little more explanation is needed with skill test cards. These are the cards that don't require a skill test.
Mysterious Chanting / This chant is heard in the darkest places. Place 2 doom on the closest cultist. If it is not there, you have to find 1 and bring it into play. There goes your Doom again! This card fills up the agenda in no time.
PRO TIP: Rest assured that your doom threshold only starts in the Mythos phase, so you still have time to defeat this enemy. Just take the Acolyte, it's gone quickly.
Hunting Shadow / Painful choice for the one who has to make it. Clues is the only thing that really matters in this scenario. My play session has shown, take the damage because loosing clues you can't afford in this scenario.
Obscuring Fog / Our investigators never mind a little fog, it puts them in the mood. But a fog that blows up your Shroud value by +2 is a downer. Then you have that this map only goes away when the location has been successfully investigated. SO IF YOU GET 1 SKILL TEST THIS CARD WILL VOID. I understand that this card only went away when the entire location was cleared. So this is not the case.
treachery with skilltest


This 2nd part of the Treacheries we go a little deeper into the Skill test that you have to do. In a number of situations in the game, an Investigator must complete a skill test, using one of his or her four skills: willpower, intellect, fight, or agility. You must therefore equal or score higher for a skill test equal to the number of points given. If you pass the skill test, you will benefit now or later in the game. If you lose the skill test, you have made it quite difficult yourself.
PRO TIP: Always try to get +3 with each skill test before you start.
Crypt Chill / A tough test for the non-Mystic among us. Test 4 willpower and if you fail it will cost you a precious Asset. So if you are not prepared for this, you will lose an item/weapon or worse, an important Ally.
False Lead / Surge from the LOTR LCG, which means; in this case if you have no clues you must draw another encounter card. If you have 1 or more clues, you have to do a skill test where we have to match the 4 intellect (book) icon. If you fail this test, you must put 1 clue back on your location. Which is quite difficult in the beginning since this costs you an extra action to earn it back.
Locked doors / This is by far the most annoying treachery you can pull in the beginning. Not only does it block your location with the most clues. It is also that you have to do a skill test to get the door open. This skill test is therefore not the least with 4 Fight or 4 Agility. Something you really can't wait for.
PRO TIP: Just leave this location alone and try to get it at a later stage, if this is still necessary.
On wings of Darkness / This is a minus and plus card. You must do a skill test of 4 agility. Which you don't get like 1,2,3. Don't worry, if you fail, there is an advantage. If you are in conflict with the Nightgaunt, it will leave you alone and you will fly to another location.
Survivors! Thank you for taking the time and effort to read this comprehensive strategy guide. We hope to have informed you sufficiently. If there are any aspects that you would like to see added, please leave a comment.
Jeroen - dutch blogger company

Survivors!
Feel free to email us for further questions, topics or cool ideas for the website.
Would you like to know more information about our new Project Dungeon to Dungeon (only in the Netherlands)? You can request the information by e-mail.
You can contact us on the following platforms, which can of course also be followed where we post great post.
Twitter: @ah_dutch
Instagram: ahdutchblogger
Mail: dutchbloggercompany@gmail.com
Do you also think this game is as cool as we think it is? Then support us on Patreon to make it more accessible for us! www.patreon.com/dutchbloggercompany

Felix Meyer (Monday, 02 September 2024 10:27)
Hurray, this is just the right information that I needed. You make me want to learn more! Stop by my page <a href="https://college.captainu.com/college_teams/1851/campaigns/51473/tracking/click?contact_id=1154110&email_id=1215036&url=http://webemail24.com/your-guide-to-email-marketing">Webemail24</a> about SEO.