the house always wins

Dr. Armitage suggested you track down his associate Dr. Francis Morgan. He’s not sure whether Dr. Morgan is in trouble, but he’s not particularly happy with his colleague’s present choice of company. He’s in the Clover Club, a notorious gambling joint somewhere downtown. Finding the club’s exact location isn’t easy—you have to grease a few palms just to learn which of the Downtown restaurants operates as the club’s front. That restaurant is La Bella Luna, a somewhat upscale Italian eatery by the theatre. You change into your Sunday best and make your way there.
In front of La Bella Luna stands a man in a pinstripe suit who sizes you up as you approach. “Enjoy yourselves,” he says with a snake-like grin as he holds open the restaurant’s front door.
Looks like we gonna play some cards and do heavy drinking tonight survivors! The story continues in the Clover Club in downtown Arkham. Let's have a blast in this wonderful scenario. We gonna meet the local gangsters but there's something off about this night. There's a strange vibe hanging around the club but we do not know what's going on around here......
the setup
Dr. Francis Morgan was last seen gambling at the Clover Club, an upscale speakeasy and gambling joint located downtown. Let’s go talk to him.
Gather all cards from the following encounter sets:
- The House Always Wins
- Bad Luck
- Naomi’s Crew
- Rats
- Hideous Abominations
- Striking Fear
- Set the Hideous Abominations set and Striking Fear encounter sets aside, out of play. (this will be back in the game in no time).
- Put the Clover Club Lounge, Clover Club Bar, Clover Club Cardroom, and La Bella Luna locations into play. Each survivor begins at the La Bella Luna location.
- Put Clover Club Pit Boss into play in the Clover Club Lounge.
- Set the following cards aside, out of play: Darkened Hall, Peter Clover, Dr. Francis Morgan, and each copy of Back Hall Doorway.
- Shuffle the remainder of the encounter cards to build the encounter deck.
ALOOF RULES
Aloof is a keyword ability. An enemy with the aloof keyword does not automatically engage investigators at its location.
- When an aloof enemy spawns, it spawns unengaged.
- An investigator may use the engage action or a card ability to engage an aloof enemy.
- An investigator cannot attack an aloof enemy while that enemy is not engaged with an investigator.
IMPORTANT NOTE: At the start of this scenario, agenda 1a grants each Criminal enemy the aloof keyword, which stops those enemies from automatically engaging you. At some point, those enemies may lose the aloof keyword. Remember that enemies who are no longer aloof will automatically engage investigators at their location, as per normal.
IMPORTANT NOTE: We all played this game for many hours now. But there's sometimes still a confusion of rules. In this strategy guide we want to point it out again to all of you so you will understand the rules better each time you are playing.
If there is a card or in this case an act card that says you will have to spend clues in a specific location as a group. They mean that if you are in that location you can spend every clue from everybody thats playing right now. So only one of you must make it to the location to spend it as a group. If there was a text like you only can spend clues in a specific location to advance then everybody must be at that location to drop of clues! This was a little mistake that new players often make.

The Clover Club Pit Boss
This criminal is the real deal around this Club, you don't want to make this baddy mad. He's in charge on this evening and you don't want to stay long with him in the same room.
He has a stat of 3/4/3 that's something right? It's all about average but with the aloof rule active you shouldn't be to worried about him. He's a hunter so where ever you go in the enemy phase he will follow you. And if you have two investigators at the same place he preys an the one with the highest intellect stat.
If you ever gather clues around him (at the same location) he will immediately attacks you! Even when he's exhausted. He readies and make an immediate attack, so watch your back! Little side note he has 1 victory point if you dare to fight him.
the journal setup

Professor Warren Rice
If you played the first scenario and you read our first strategy guide you have won the Warren rice card. If you didn't read the article and you want Warren rice his help hit the link and find out how to obtain the Prof. Rice card.
His stats are 2/3 and the 3 sanity is a massive win. You can soak up some horror in bad situations. But thats not all. Also you will get +1 intellect and if you discover the last clue on a location you can exhaust Warren and draw a card. The cost is average to. 3 is not high and not low for the ability you get with this card.
But there's a little catch, if you saved the professor you have let down the students. This means that The Experiment slain all the students and you will suffer. You suffer consequence is that you have to put 1 extra tablet token in the chaos bag for the remainder of the campaign.
the first (visible) locations


La Bella Luna / This location is the staring one, 2 shroud and 1 clue per player. Here begins our investigation. Almost everyone can get these clues. PRO TIP: get these clues in the first round.
Clover Club Lounge / zero clues, if you are in act 1 you can discard an ally card from play to gain 2 clues from the token pool. There are a lot of cheap ally’s you can discard easily. In our experience no ally lives long enough and you are always depending on your investigator with his/her tricks and weapons. So if you can play a cheap ally card like Stray cat in your first round it will makes your next turn a lot easier. And if you use a card like the Stray cat, what every enemy drops from the encounter deck you can automatically evade this enemy by its card ability.
Clover Club Bar / zero clues, but you can have a shot of whiskey for 2 resources. But you have to remember that you had a drink and you can only trigger this action if you are in act 1. It also cost you a action but hey 1 action form 2 clues that almost free and the trouble comes later on. Over to the trouble you will face if you had a drink, there is a encounter card that will punishing you from being a drinker. Something in the drinks is the card that the drinker didn’t want to draw from the encounter deck. Because you soon find out that your drink was poisoned and you will lose one action. Also the keyword surge comes in play and this means you will have to draw another encounter card.
Clover Club Cardroom / zero clues, welcome to the room where you luck flurries or runs out. Spend an action and trigger the gamble ability, spend 2 resources and reveal a token from the chaos bag. If this token is either the elder sign token (the blue one) or a even number you will win 2 tokens from the token pool. But if you run out of luck with a odd number or a bad token indicated on the card you will lose and win nothing.
agenda and act nr. 1
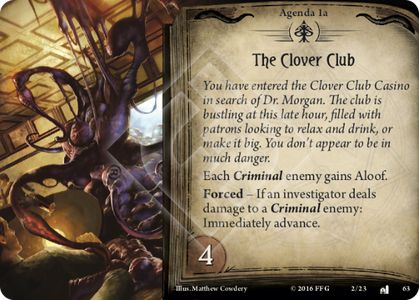

Agenda NR. 1 - The clover club.

Agenda 1B - On the right track
You explore the club but tracks a lot off attention of the hired thugs. They say that Dr. Francis wouldn’t want to disturbed.
If you reached the fourth dome threshold you must advance (only when you are in the mythos phase 1.3). Shuffle the encounter discard pile back in the encounter deck. If “the house always wins” is your first scenario of the Dunwich cycle advance to agenda 2A but is “extracurricular activity” is your first scenario then advance to 2B.
So you can see how good this game is. Even the scenario you begin with will effect your play sessions. That’s why this game is so freaking awesome!

Act NR 1B - High roller
Dr. Morgan is making money tonight. He’s last seen entering the VIP area to double down his cash.
Put into play the darkened hall and shuffle the encounter discard pile back into the encounter deck. But to to get to the VIP area you must fight of a criminal enemy. Discard cards from the encounter deck until you draw a criminal enemy and put that enemy at the darkened hall location. (This only happens when you are at agenda 1A).
Agenda and act nr. 2


Agenda NR. 2 - Underground muscle
The mobsters are closing in on you. You only have 3 doom tokens left to get a beat up.........
Now it's time to hurry up and get moving. Create a solid board state now because shits gonna hit the fan! If you are lucky you get 3 full rounds to make your investigator strong and ready. But there is also a little change you can collect more clues.
PRO TIP: one of you must collect the remaining clues fast and the other wel prepare for the worst.
Act Nr. 3 - Skin game
Dr Morgan is in the VIP area and you will need to find him fast! But if you are the clue guy/girl don't forget that je must enter the darkened hall and there is a mobster waiting for you. Only the investigator in the VIP area can spend clues as a group, but thats no problem. The problem is that you have to act faster the 3 doom on the agenda card is over in no time. Gather the four clues and spend them in the VIP area to advance.

Agenda 2B - Sudden chaos
When the doom threshold is reached then you advance the agenda deck to fight of some thugs or is it........ A huge monster smashes trough the entrance of the club en beats down mobsters and patrons alike.
Move all investigators and unengaged enemies from the La Bella Luna to the Clover club lounge. Remove La Bella Luna from the game. This is the moment where you prepared for. All enemies and alike in the same location.

Dr. Morgan's Fate
Welcome to Arkham horror! It's your story and because you have to choose which scenario you begin with there for also the outcomes our completely different. We will handle both of them because this is a complete strategy guide.
First things first. Gather the 2 clues per investigator to advance the act card. Remember you can only spend clues in the VIP area. If this "The house always wins" is your first scenario then you found Dr. Morgan in the VIP area. And because this is you first scenario of your choosing advance to Act 3A - All in.
But if you played "Extracurricular Activity" first Then you will never meet Dr. Francis Morgan. You came to the VIP area to discover that every patron was killed and there was no trace of Dr. Morgan. You heard gunshots from the mean area. Put Peter Clover (probably the owner) in the Clover club bar. Also search the encounter deck or out of play for an abomination enemy and spawn it to the Clover club bar. Advance to Act 3A - FOLD!

DR. Francis Morgan - Professor of Archaeology
You finally found Francis! He was playing cards in the VIP area.
This powerful ally can be included into your deck. But you must get him out of his daze. Read the article further to learn how to do it.
This lay comes into play for 3 resources and has a stat of 4 health and 1 sanity. The sanity is on the low side but in Dunwich there aren't many cards that will deal direct horror.
You will get +1 fight power and he has a response ability that will provide you with extra card draw. You must defeat a enemy and exhaust Francis to draw a card.

Peter Clover - Holding all the cards
To achieve Peter you must read on. It's not a pleasant way and there are many obstacles. But with a little help of this guide you will manage.
Comes into play for free. You only have to pay the action cost. Has a forced effect what only matters when you don't controle Peter. In the enemy phase if no one controles him deal 1 damage to Peter. He will have to act fast if you want to gain controle over Peter and don't want to lose him.
Has a pretty cool stat of 3 health and 2 sanity so he can soak a little for you. And when the real shit happens he wil stand his ground. Also Peter has a response ability Exhausted Peter and automatically evade a criminal enemy at your location. And there will be a lot of criminals in the future cycle of Dunwich. So get him on board of your team.
agenda and act nr. 3


Agenda NR. 3 - Chaos in the Clover club
The abomination is killing everything in its path. The hole club is in chaos. This last agenda has a long breath. With at least 7 doom tokens this one gonna last long. Better for the investigators because they need to get out of the club.
At the start of the enemy phase discard every enemy in the same location as the abomination.
Act NR. 3 - All in
To get Dr. Morgan on your site is probably a lot easier than achieving Peter Clover. But Peter Clover is a much better ally to get on board but more on that later. If you want to get a hold of the professor you must go to the VIP area. There you can preform an action parley and test 3 willpower. If you succeed the test you can put a clue token from the token pool on him. If there are 1 clue per investigator on Dr. Morgan you may gain controle over him.
To win or advance this scenario you must find an exit and fast the clock is ticking. If every investigator resign advance.

Safe..... for now!
You managed to get out of the club alive. You are walking along thugs with their hands on their .38 gun and they are looking at you. But their attention was elsewhere. Lucky for you.
If you got out with Dr. Morgan then you should be reading ending number R2.
But if didn't get out with Dr. Morgan then her over to the R1 section of the play sheet.

The building collapse
You ran towards the exit but at the last moment the building collapse with you under need it. The abominations make this place like a warzone and almost every mobster and patron where killed at on instant.
This is the baddest way of finishing the scenario. If you didn't manage to get out there read further with R4.
if this is the first scenario you play - Act nr. 3 FOLD

EXTRA ACT NR. 3 - FOLD
If you skipped the first scenario and this is your first stroll in the Dunwich legacy then The FOLD variant of the act deck will become your objective target. And you didn't found Dr. Morgan but there is a Big shot mobster (or owner of the club) how wants your help badly! This character is Peter Clover and a must have card to ad to your deck. But it will come with a cost.
This is the tricky part for this scenario. Peter spawns in the Clover club bar and with a terrible card next to him. You must search for an abomination enemy and put that as well in the bar location. Every enemy phase you didn't have Peter it will get one damage. This is a bad thing because Peter is 3 locations away and you really want this card. So in order to get to Peter you must travel to the bar and parley with Peter. The abominations are bad enemies and strong. You probably won't kill one but the best strategy is to evade the monster and parley with Peter. If you managed to get to the bar preform an action parley and test 3 willpower. If you managed to get 2 clues on Peter then he's all yours. So the best thing to do is skip one hole turn on getting there. Then in one turn evade the monster and prepare the last 2 actions to parley with Peter! But the fight isn't over just yet. You will face the monster again because he will flip back in the next enemy phase. Then for your last turn, evade again and make your last 2 moves to find the exit. Yeah we know its really hard because between everything there still the mythos phase. But its a coop game so for the last turns stick together and help each other out in the best way you can!

Escaping the Club
If you resign correctly that means every investigator in the game you will advance. If you reached the streets safe and sound with Peter head over to the R3 ending otherwise continu with the R1 ending.
our thoughts of the SCENARIO
This scenario is real fun to play. All the extra stories and ally's you can get only because you will have to make choices before you even dropped a card on the table. This is what makes Arkham horror so strong. Every play session is different than the first time you played it. The overall thoughts of this scenario is that it's real hard to get Peter. But the reward is awesome. The abominations are really strong and must evaded at all times and cost. But if your are playing with someone from the guardian class you maybe able to kill one. But in our case we always evade these baddy's. The last 2 a 3 turns are the must important ones. Stick to gather and you will manage to get out alive with or without Dr. Morgan or with Peter.
Thank you all for reading this long strategy guide and hopefully it may help you on the journey in this awesome cycle.
Next stop The Miskatonic museum.
Jeroen - dutch blogger company

Survivors!
Feel free to email us for further questions, topics or cool ideas for the website.
Would you like to know more information about our new Project Dungeon to Dungeon (only in the Netherlands)? You can request the information by e-mail.
You can contact us on the following platforms, which can of course also be followed where we post great post.
Twitter: @ah_dutch
Instagram: ahdutchblogger
Mail: dutchbloggercompany@gmail.com
Do you also think this game is as cool as we think it is? Then support us on Patreon to make it more accessible for us! www.patreon.com/dutchbloggercompany
