the gathering......
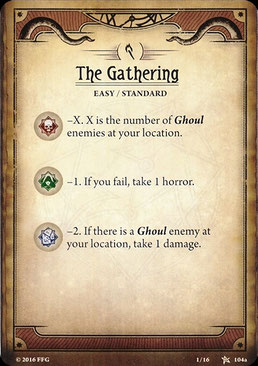
Investigator's welcome to the strategy guide of our first adventure.
The Gathering ......
It is Friday, September 18, in the year 1925. It has been a very hot summer and everyone is a bit annoyed with each other, which makes the tensions in the city high. Not surprising when it has been so hot in the past month. You get the message that there is a lot of fighting and a number of murders take place. Not that you are surprised, but there is a nasty atmosphere around the city.
You'll soon receive a call from James Hanckerson claiming to have found a torn body in his shed. A lame excuse for a too hot summer doesn't kick in James and you dive deeper into this story ...
the setup
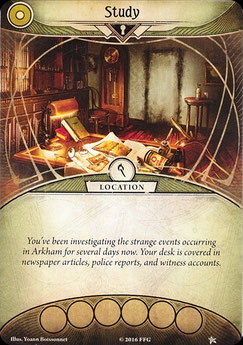
Find the different encounter sets together and shuffle them well. Put Lita Chantler and the Ghoul Priest out of the game for later use .....
The other locations will also be offside for later use.
Put the Study in play as the first location and this is also the location where your investigator's start. Collect the tokens you need such as resources, horror, damage, doom and the clue tokens. Place the agenda and act cards at the top of your playing field and here next to the encounter deck. Collect the desired tokens for the chaos bag and prepare your bag. Please note that we play on standard mode. Grab your mini flip cards for your investigator and let the horror begin.
Also very important is who will be the lead investigator of your team?
the phases you will pass through
This is the order of how the game works:
1- Mythos phase (you must skip this on the first turn of the game)
• put one doom token on the agenda.
• if there are enough doom tokens on the agenda, they must be turned over.
• take one card per player from the encounter deck. One after the other so that you can support each other.
2- Investigator's phase
• each investigator takes 3 actions. First, take 3 actions before it is the turn of the other investigator.
3- Enemy phase
• Each enemy with the term Hunter crawls one location closer to the nearest investigator.
• every enemy attacks (if possible).
4- Upkeep phase
• reset all cards (flip the mini cards).
• all exhausted cards are upright again.
• take one resource.
• take one card.
• each investigator counts his or her cards in his or her hand (maximum 8)
the actions you can take
You can only take 3 actions per turn. These are the actions in sequence:
- take one card or one resource.
- trigger an ability (the arrow).
- play a card (asset, item, event ect).
- move (move to adjacent location)
- fight or engage an enemy at your location.
- Evade an enemy (try to outsmart an enemy)
- investigate (try to find clues at your location by means of a skill test)
- Triggers such as the Zig-zag sign or the response sign and spinning arrow do not count as an action.
When in conflict with an ememy, your first action should be fight of Evade. In some cases you can also choose Parley or resign, but this depends on the scenario. If you do not do this, the enemy will take an attack or oppertunity and you will immediately receive damage or horror.
agenda and act nr. 1A
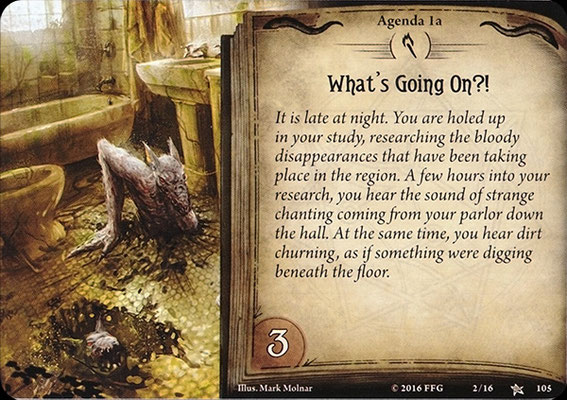
You are at home in your study, you have begun an investigation into the disappearances of the locals of Arkham and the dead they keep finding. Your table is littered with newspaper articles and other books to get yourself some information. You hear a loud noise coming from the hallway and the moment you walk towards it you hear a kind of singing. Suddenly the door to the hallway disappears and you are trapped in your own study.
The agenda deck needs 3 doom tokens to move to the next agenda item. This is where the horror starts and you want to avoid this. You have to get through the act deck as quickly as possible and you do this by issuing your found clues. You need 2 clues per investigator for this act card.
agenda and act nr. 1b
You have discovered the puzzle and find out that under your carpet is now the door. You jump down and end up in the hallway. You hardly notice anything from your own home. Everything is covered in mud and sand. It looks like your house is falling apart.
You have moved one space further and this is a good sign. You may remove all enemies in the game and you may also remove the study location. Now place the following locations in the game Hallway / Cellar / Attic and the Parlor. We will come back to that later. The investigators start in the Hallway.
If by chance the agenda has flipped, normally in our adventures this happens before the act deck. The following is going to happen. The lead investigator must make a choice. Your first choice of this game.
Either both investigators discard one card from their hand at random or each investigator gets 2 horror. Yikes! difficult choice ..... We usually go for discarding a random card, because getting horror is never good. Well investigators you have kicked this far, let's dive deeper into our own house again.
agenda and act nr. 2a
When you have found the right amount of clues, the act deck advanced. So this says nothing about the agenda. As soon as there are 3 doom tokens on it, it will only continue. But we will treat them both, this is easier and clearer.
The floor below you breaks and you see all kinds of tunnels under your house with strange animals. You cannot see it properly, because they are fast. They're trying to come up! You want to go to your salon, but unfortunately this is impossible. There is some kind of magical barricade blocking this. You throw a hand of sand against it and see that it burns in front of you. What now? You can take a look at the following locations.
The hallway is where you start and the Parlor cannot be entered because of the magical blockage. You may only turn the location card when you are actually here. To find clues you have to do a skill test with the investigator icon (the booklet). Shroud is the black circle and if you want to pass this test you have to finish above a 1 or 4 depending on the location with the test. This way you can collect clues. Don't forget to rummage in the chaos bag. This is of enormous importance to the game! Just a quick reminder. A location always has its own color at the top left. The color scheme at the bottom of the location indicates where you can move to. This means that you cannot just go in all directions from your location. Unless of course you have certain cards that form a portal, but we are far from that yet.
Hallway / 1 shroud 0 clues, a useless location. You should only come back to this place at the end of the round when you have collected enough clues to spend the clues for the next act.
Attic / 1 shroud and 2 clues per investigator, if you go to this location you get 1 horror.
Cellar / 4 shroud and 2 clues per investigator, if you go to this location you get 1 damage. A shroud of 4 is quite high, make sure you are ready. Otherwise you better do this location later.
Parlor / 1 shroud and 0 clues, a location not to be investigated. You can, however, give up the game here if you think it is too dangerous, but we have not done this so far. You will have the opportunity to perform a Parley with Lita Chantler. This is done as follows, use an action to perform Parley and do a skill test of a 4 investigate. If you pass this, you can take control of Lita Chantler.
agenda and act nr. 2b
AWWWH! The agenda has flipped again after obtaining his doom tokens. You can now see the animals more clearly and you can hear them running and gnawing. You know they come it's now or never .....
Shuffle the encounter discard pile back into the deck and then keep taking cards until you catch a Ghoul enemy. This will be placed in the threat area of the Lead investigator. Not a very bad agenda flip, because you are now so far that you have a nice defense. Or you can easily clean up this Ghoul. After obtaining the necessary clues you can turn the act card over.
Since you have been in the attic and basement, you have found items that can clear the magic block. Now spawn the Ghoul Priest in the Hallway and Lita Chantler in the drawing room.
agenda and act nr. 3a
You will hear a loud howl or earlier and roar coming from the salon! This Lita Chantler who is causing unrest. Every Ghoul enemy wants to run to the salon to provide help! You are stuck with the Ghoul Priest and your only way out right now is to defeat this Priest!
You can play this scenario in different ways, but beating the Ghoul Priest is a MUST if you play campaign.
Once you have arrived at this agenda 3A, it will be very difficult for you. Not only do the Ghoul enemies come your way at each end of the round, an extra doom token must be placed on this card. Act 3 is simply defeat the Ghoul Priest.
lita chantler and the ghoul priest
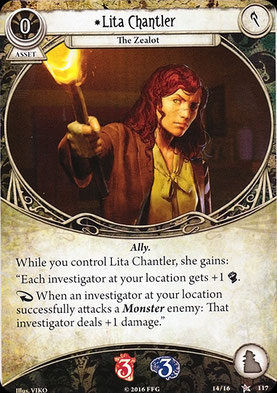
Lita Chantler The Zealot, is an ally that you encounter in this scenario. You can take control of her through a Parley! But you will have to find her in the salon among all the Ghouls.
Her ability is that every investigator on your location gets a +1 in fight. It also gets +1 damage when it attacks a monster. You definitely need this when it comes to defeating the many Ghouls and of course the Ghoul Priest.
She also has a 3/3 stats so she can absorb quite a bit of damage and horror for you.
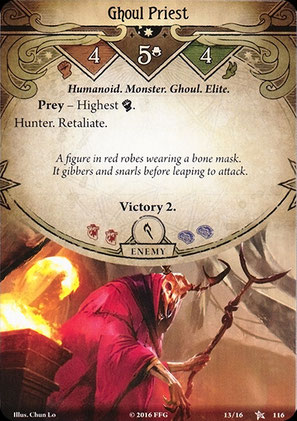
The Ghoul priest ....
Monster, Humanoid, Ghoul and Elite! All scary names, but only these 3 are relevant. Retaliate, Prey and Hunter.
Retaliate / means that if you fail in a fight or evade action, the Priest will deal his horror and damage to you equally.
Hunter / if you have the Priest evade and he is in a different location, he will move one location closer to each enemy phase.
Prey / Hold in if there are 2 investigators in the same location you cannot choose who engaged him but he automatically goes to the one with the highest fight ability in this case.
his stats are gruesome 4/5/4 so you can't beat this monster just like that.
4 fight / You must have a high fight ability to match this.
5 health / per investigator so in our case 10. Difficult since you only do 1 damage each time you have no items or weapons.
4 evade / You don't think that's a tricky package. So everything is high about this Priest, but don't forget you still have Lita.
agenda and act nr. 3b
Yes we have arrived at the last flip and also the Resolution options!
Agenda 3A - other words YOU FAILED! If you are still playing around with act 1 or 2, you will remain trapped there and the Ghouls will jump around you. They tear you apart and you will not come out very skin. Read in the manual R3 because we are not going to spoil these resolutions. If you have passed act 1 and 2 and you are at number 3, you just manage to escape and you are left with a damage trauma. You can read more about trauma in this way. So you did not make it and therefore did not end well. Read the Resolution defeat in the manual.
Act 3a - You made it and already hit, stab or shoot the Ghoul Priest! The lead investigator has to make a choice, and not an easy one. Of course we are not going to reveal what happens with the choice you make. Leave the house and you should read resolution 1 if you dislike your house burn it down and read resolution 2.
campaign log, resolutions and trauma
You will not have missed it, but Arkham Horror is based on the campaign mode. This is an ongoing story with all kinds of choices you have to make. Each scenario has multiple endings and you never know what to expect. Every road you take becomes different and so the Resolution is different. For example, this scenario had 3 that we will not tell you because this is super cool to discover for yourself.
Campaign log is something you have to keep and write down. The choices you make will affect your next play session. Each Resolution therefore has its advantages and disadvantages. Keep this good because this is very important and of course very cool.
Trauma is a condition that takes you through the rest of the campaign mode. This can be damage or horror that you carry with you from the start. If your investigator has a low score of horror and gets horror trauma, the next round can quickly end. So if you have a 9 horror score and you get such a trauma, you now have 8 and you cannot brush them away with any card.
encounter analyse
The gathering, striking fear, rats, ghouls, ancient evil and finally chilling cold. These are the encounter cards that you will use in this scenario. In this chapter, we'll take a closer look at what's in store for you. We will divide this into 3 categories.
1) Enemies / we will see which enemies you can expect and what you can do best against these monsters.
2) Treachery / These are the pitfalls of the game. We have divided them into 2 groups with and without skill test.
3) Treachery with skill test / for this treachery you have to dive deep into the chaos bag again.
enemy cards
For this scenario we count 1 Rat and 4 Ghouls (not counting the boss enemy). It remains one of our favorite scenarios. This is the scenario that made us fall in love with the amazing game. The Ghouls bring a cool theme with them and you no longer feel safe in your own home.
PRO TIP: This LCG isn't always about fighting monsters, but you're supposed to collect clues. Do not always confront the enemy. Plan your steps and actions well and become a master of calculating odds by memorizing the chaos bag.
Rats / One of our first experiences with the combat system was with this particular swarm of rats. Well they are not special, but for us this was the first enemy we defeated in Arkham Horror. The stats 1/1/3 say it's better to kill these swarms of rats with one punch than avoid them. Don't be too difficult about this with extra cards for your skill test or weapons. 1 blow is enough. Deals only 1 damage and has the keyword Hunter. Hunter means that if this rat is in a location and does not conflict with an investigator, it will hunt. every time it is the enemy phase, the rat moves 1 location closer to the investigators.
Flesh-eater / A Nasty ghoul who loves meat. And let's consist of meat for once. This Ghoul appears in the attic, so any investigator in the attic will suffer from this enemy. Let alone if you still have to go to the attic. His stats of 4/4/1 again let you go ahead with the game. You can avoid him very easily. This monster is out for fear, so he also does 1 damage and 2 horror damage. You can kill this for a victory point, but it's not worth it. You earn enough with the locations.
PRO TIP: attack him 2 times and dodge him the 3rd time. This way you will not be bothered by this enemy and you have killed him in 2 turns.
Ghoul Minion / This minion is a fun challenge. This one appears immediately in your Threat area and has a stats of 2/2/2, this is not the highest and most difficult, but his 2 fight can make you bounce in the beginning. This is probably your first playing session and you are still sitting with your eyes in the rulebook figuring out the rules. This Minion does both 1 damage and 1 horror damage.
Icy Ghoul / This is the leftmost Ghoul (except for the Priest) you can get in this scenario. If you're not ready, don't look up this Ghoul. The stats say enough. 3/4/4 You certainly have trouble avoiding this enemy and with his 4 health he would still do you quite a bit of damage. The icy Ghoul deals 2 damage and 1 horror damage. Strongly avoid this ghoul and only go into battle when you are really ready. Never mind the victory point with this one. It's not worth it. The same goes for the FLesh eater.
Ravenous Ghoul / An upgrade from the Ghoul minion, 3/3/3 are the stats of this monster and it takes a little more thinking and calculating. This has a keyword prey, which means that if there are 2 investigators at a location, in this case it will compete with the one with the lowest health left.
elite enemy (boss enemy)
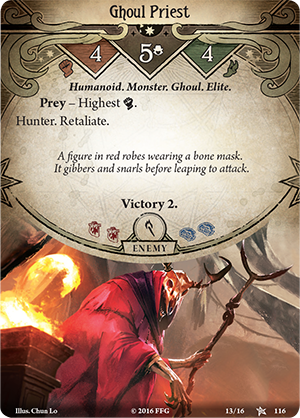
Each scenario has an elite enemy or what we called the boss enemy. This is kind of a final boss. In this specific case it is the Ghoul priest and if you don't get him killed in The gathering ..... then we can tell you that he will return the following scenario.
Well this is a strategy guide and we want to help you defeat this monster. It's a tricky package where you are with this monster. Not only do you have the chance that more monsters will come, but there is also the chance that you have already used all your weapons or items when defeating an Icy Ghoul of the Flesh-Eater.
In any case, take the time to plan for this monster. Our PRO TIP is that you make the investigator you play with the following scenario battle ready with upgrade cards. Only then does this monster try to tackle. Your base cards you now own (without upgrade) are frankly no match for this evil Ghoul.
treachery
Your first treachery cards that you will encounter in this masterful game.
Ancient evil / One of the worst cards of all. TEMPO you know it from our blogs. Mowed into the ground with this. Especially if your agenda is freaking out, because you don't have to wait for the Doom threshold to come, no, no. That is happening right now on the spot where they are really talking about. That way you lose 3 actions in one go. If you play 6 actions with 2 players. You should know what you can achieve with 6 actions. If you are not well prepared, you will be far behind.
Dissonant voices / This is also a tricky one. All those voices drive you crazy. Especially if you were preparing to take out the Ghoul priest. You can't play anything unless it is an event or skill card. At the end of your turn, this card disappears again.
Obscuring Fog / Our investigators never mind a little fog, it gets them in the mood. But a mist that blows your Shroud value up by +2 is a downer. Then again you have that this card does not go away until the location has been successfully investigated. SO IF YOU GET 1 SKILL TEST THIS CARD WILL BE EXPIRED. I understand that this card only went away when the entire location was cleared. So this is not the case.
PRO TIP: you can use a flashlight to remove this +2 for an investigation action. That way you can get it easier and you are also rid of that damn fog.
treachery with a skill test
These are the cards that require a skill test from you. It's like a coin flip every now and then. You never win anything but if you fail you are further into shit than you would like. The moment of truth. Here it is all about calculating and calculating probability whether you can pass certain skill tests. It is really crucial that you become a master at this. This will kill you more often than a Ghoul or whatever enemy. Not only do you lead under you here as a team and this is a problem for everyone as these cards can mess up your planning quite a bit. Revelation means that you have to let this test or card do its effects right away.
PRO TIP: If you don't want to gamble always try to stay +3 above the requested number then you are usually safe.
Grasping hands / The hands from the floor grab your feet. Do a skill test of 3 agility and for every point you miss you get 1 damage.
Rotting remains / Skill test for 3 willpower. If you win nothing happens but if you lose it costs you 1 horror damage per missed point. The upside-down Grasping hands.
Frozen in fair / This is a very annoying card. Think of the blog TEMPO, well you can forget that with this card. Each of the following actions will cost you an additional Move / Fight / Evade actions. At the end of your turn, you get the chance to take a 3 willpower skill test. If you win, the card will be removed and otherwise Frozen in fair will remain in your Threat area.
Crypt Chill / One that eats away your assets without you realizing. You have to do a skill test of 4 willpower. In our case, this has almost never succeeded. At the time, we played with investigators who had little to no willpower and we never got close to 4 to play it safe. So almost an automatic fail.
We hope you, like us, are eager to play this game again. In any case, we will continue to play and collect cool items for this LCG. Hopefully you got a better look at this. This was our first review in English so be gentle with the grammar.
It is difficult to determine what I will do in your cases in terms of playing this game because every play session is completely different. We have now been able to enjoy ourselves for more than 15 hours with only the Night of the Zealot core set! Leave a comment and stop the evil from spreading.
Jeroen - Dutch blogger company

Survivors!
Feel free to email us for further questions, topics or cool ideas for the website.
Would you like to know more information about our new Project Dungeon to Dungeon (only in the Netherlands)? You can request the information by e-mail.
You can contact us on the following platforms, which can of course also be followed where we post great post.
Twitter: @ah_dutch
Instagram: ahdutchblogger
Mail: dutchbloggercompany@gmail.com
Do you also think this game is as cool as we think it is? Then support us on Patreon to make it more accessible for us! www.patreon.com/dutchbloggercompany



Swiss AH Fan (Thursday, 19 September 2024 22:04)
Beginner questions, on moving from act 2a to 3a, it says you spend the clues at the end of the turn, so after enemy phase and upkeep. Then the act advances to 3a and you reveal the parlor, Lita and spawn the priest…then are we supposed to have the mythos phase and therefore we might get an extra enemy in the same round? Or the Priest is already the mythos?